Connecting FaxPress Archive to a DSN (SQL Databases)
When FaxPress Archive is configured for an MS SQL database (see Configuring Archive for an MS SQL Database), the FaxPress Premier requires a DSN to use for writing to the database.
During the configuration, the current ODBC connect string will be displayed in the ODBC DSN dialog box’s Select a Data Source Name... field. The connect string is generated automatically when a DSN is selected and a connection to the server is successful.
If a DSN is not displayed or you want to select an alternate DSN, clicking the Browse button will let you either select a different existing DSN or create a new one.
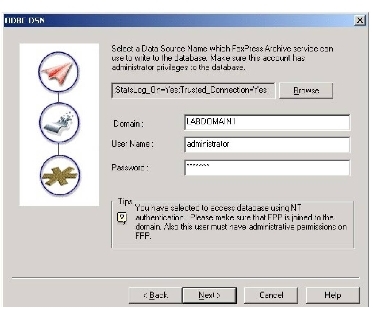
The login account to the database server must have permission to create tables in the database. The same DSN will be used by the Archive program to connect to the database to enter data.
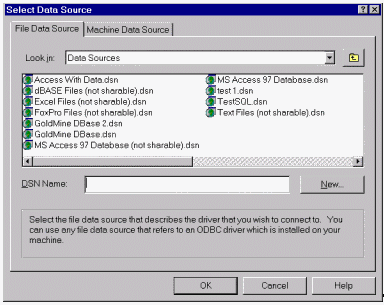
If the appropriate DSN is not present, you can either select an alternate DSN or create a new DSN. To select an alternate DSN or to create a new DSN, click Browse in the ODBC DSN window above, and then follow these steps:
| 1. | Clicking Browse opens the Data Source Administrator screen. |
| 2. | Select the Machine Data Source tab. This screen lists all the user and system DSNs installed on your workstation. |
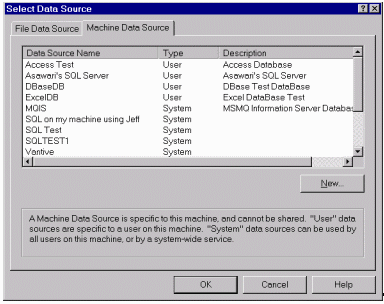
Select a data source that connects to the database server and that is defined as a System DSN type. Do not select a DSN that points to a file-based database (e.g., Access, Dbase, Paradox, Excel, CSV, FoxPro, etc.). The Type of each DSN is indicated in the middle column by User or System.
A User DSN is a DSN that can only be seen by the login user that created it.
A System DSN is a DSN that is visible to all users on that workstation no matter who created it.
To create a new DSN to an MS SQL server, rather than selecting an existing DSN, click New to open the Create New Data Source wizard.
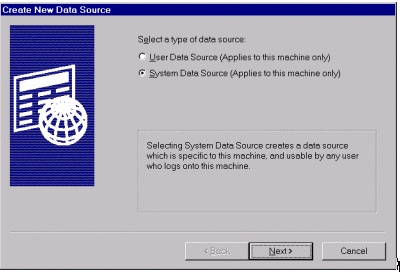
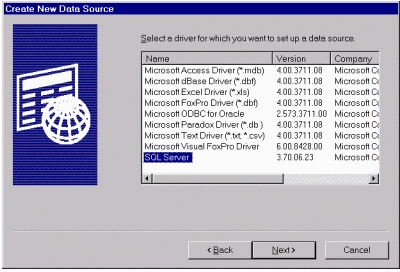
| 3. | The Create New Data Source wizard walks you through creating a DSN. The first page will ask what type of DSN to create. Select System Data Source. |
| 4. | The next screen will display the list of available ODBC drivers installed on your system. Select SQL Server. |
| 5. | The next screen will display the new data source. Click Finish to complete this section and proceed to configuring the connection. |
| 6. | The next wizard prompts you to configure the connect string. |
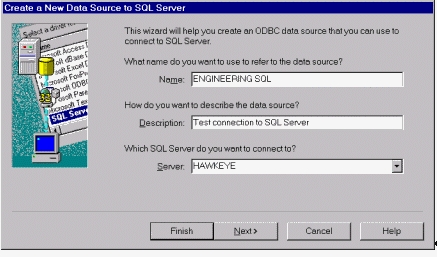
For the new DSN, enter:
Name: The name of your new DSN.
Description: This is an optional field.
Server: The is the name of the SQL server.
| 7. | Click Next>. |
| 8. | Select either Windows NT or SQL server authentication method from the next screen. |
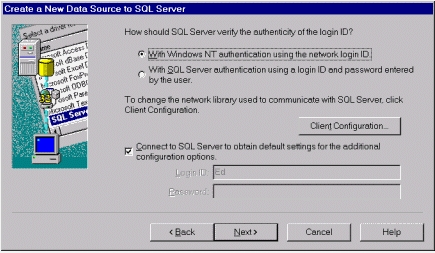
The method you select will depend on how the database is configured.
With Windows NT authorization using the network login. If the authentication is by NT, then the current user logged into the workstation is used for authentication and the UserID and password fields near the bottom of this screen are grayed out.
With SQL Server authorization using a loginID and password entered by the user. If the authentication is by SQL server, then a user name and password are required in the text boxes near the bottom of this screen.
In either case, the user must have permission to create tables on the database.
Click the Client Configuration button and select the appropriate protocol.
| 9. | The next screen specifies the default database and when to cleanup temporary stored procedures. |
Select Change the Default Database To and select the your database from the scroll down list.
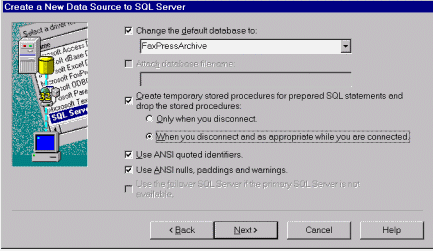
For the rest of the setting in this dialog box, we recommend that you select the following:
Select Create temporary stored procedures for prepared SQL statements and drop the stored procedures.
Select When you disconnect and as appropriate while you are connected.
Select Use ANSI quoted identifiers.
Select Use ANSI nulls, paddings, and warnings.
| 10. | The next screen allows you to specify options for logging in and regional settings. Specify these as appropriate for your environment. They do not affect the operations of FaxPress Archive. |
Select Finish.
| 11. | Select the Test Data Source button to test the connection to the data source. |
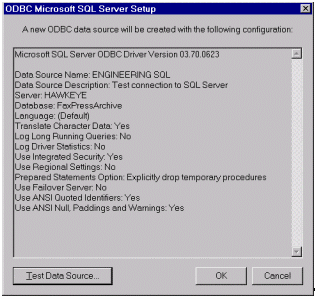
It is recommend that you test your new data source to ensure a successful connection.
|
FaxPress Premier WebHelp
Last Updated: 11/1/2007
E-mail this page |
Castelle 855 Jarvis Drive, Suite 100 Morgan Hill, CA 95037 Toll-free 800.289.7555 Tel 408.852.8000 Fax 408.852.8100 |